Deploy a cluster of nodes
(Many thanks to Oxhead Alpha for developing this great tool)
Deploying a Tezos node is a good way to address certain needs when working with the Tezos blockchain. It can be used to broadcast operations or to query specific information such as the latest block of the chain or the storage of a particular smart contract.
But when working with decentralized applications (dApps), the node can become a bottleneck.
The more people interact with a decentralized application, the more queries the node has to handle, and a single node is not suited to answer hundreds or thousands of requests per second.
In those situations, it becomes necessary to set up an infrastructure that can handle the load – by deploying a cluster of nodes.
This tutorial, inspired by Oxhead Alpha's medium article, aims to be a practical guide to deploying your own cluster of Tezos nodes using AWS cloud’s managed Kubernetes offering (EKS). For further technical explanations, we refer you to the above-mentioned article.
For our setup, we will be using Pulumi, an amazingly flexible infrastructure-as-code (IaC) tool. At the end of the tutorial, we will expose the nodes’ RPC endpoint to the internet via a load balancing system.
The resulting infrastructure is highly available, scalable, customizable, and supports rolling upgrades (a must-have, given Tezos' amendment pace). The tool enables us to scale the number of Tezos nodes as desired (0 to n).
To consult the associated code on Github, please check this link out.
Prerequisites
- AWS account and CLI tool
- Pulumi account and CLI tool
- Nodejs
- kubectl
- k9s
- Lens (used for the monitoring)
Follow the Pulumi tutorial to create an AWS account if you don’t already have one, and install Pulumi. Your AWS IAM user must have the ability to create a VPC and EKS cluster.
1 Create a Pulumi project
Create a Pulumi project using the following lines:
mkdir tezos-aws && cd tezos-aws
pulumi new aws-typescript
You may have to execute the following command, before executing any Pulumi interaction:
export PATH="$PATH:~/.pulumi/bin"
2 Tezos Pulumi installation
Install the tezos-pulumi node module:
npm install @oxheadalpha/tezos-pulumi --save-exact
Below are the most important files, which we need to take a careful look at:
values.yaml: file that specifies what we’d like the tezos-k8s Helm chart to deploy inside k8s. You may see here for the full tezos-k8s values spec but what we provide here is sufficient for the tutorial.
index.ts: Typescript file which will deploy the Tezos infrastructure. It is very customizable as we can easily write IaC (infrastructure as code) in languages like Typescript.
2.1 Populate the value.yaml file
Create a values.yaml file with the code provided below:
# Define the types of Tezos nodes we want to deploy in our cluster
nodes:
  rolling-node:
    storage_size: 100Gi
    # We create a new k8s storage class in the Pulumi index.ts file that allows
    # us to expand an EBS volume's size. The default gp2 storage class created
    # by EKS does not allow for volume expansion. We tell our `rolling-nodes` to
    # use this storage class.
    storageClassName: "gp2-volume-expansion"
    # Run the Octez implementation of Tezos node, as opposed to Tezedge's
    # implementation.
    runs:
      - octez_node
    # Create 2 Tezos rolling nodes that will be distributed across the 2 cluster
    # EC2 nodes we will be deploying.
    instances:
      - config:
          shell:
            history_mode: rolling
      - config:
          shell:
            history_mode: rolling

# Have the nodes download and use a tarball of a mainnet rolling node
# filesystem. This allows the nodes to sync much faster with the head of the
# chain than if they started from the genesis block.
rolling_tarball_url: https://mainnet.xtz-shots.io/rolling-tarball
# The default tezos-k9s Helm chart values.yaml uses this field by default. So we
# set it to null here to disable it and use the tarball url instead. Syncing a
# node from a tarball is much faster than a Tezos snapshot.
rolling_snapshot_url: null
2.2 Populate the index.ts file
Paste the following code in the index.ts file generated by Pulumi, overwriting the Pulumi generated code. Read the comments to get an understanding of what is happening:
import * as awsx from "@pulumi/awsx"
import * as eks from "@pulumi/eks"
import * as k8s from "@pulumi/kubernetes"
import * as pulumi from "@pulumi/pulumi"
import * as tezos from "@oxheadalpha/tezos-pulumi"

/** https://www.pulumi.com/docs/intro/concepts/project/ */
const project = pulumi.getProject()
/** https://www.pulumi.com/docs/intro/concepts/stack/ */
const stack = pulumi.getStack()

const projectStack = `${project}-${stack}`

/** Create a vpc to deploy your k8s cluster into. By default the vpc will use
 * the first 2 availability zones in the region. Public and private subnets will
 * be created in each zone. Private, for cluster nodes, and public for
 * internet-facing load balancers.
 */
const vpc = new awsx.ec2.Vpc(
  projectStack,
  {
    subnets: [
      // Tag subnets for specific load-balancer usage.
      // Any non-null tag value is valid.
      // See:
      //  - https://docs.aws.amazon.com/eks/latest/userguide/network_reqs.html
      //  - https://github.com/pulumi/pulumi-eks/issues/196
      //  - https://github.com/pulumi/pulumi-eks/issues/415
      { type: "public", tags: { "kubernetes.io/role/elb": "1" } },
      { type: "private", tags: { "kubernetes.io/role/internal-elb": "1" } },
    ],
  },
  {
    // Inform pulumi to ignore tag changes to the VPCs or subnets, so that
    // tags auto-added by AWS EKS do not get removed during future
    // refreshes and updates, as they are added outside of pulumi's management
    // and would be removed otherwise.
    // See: https://github.com/pulumi/pulumi-eks/issues/271#issuecomment-548452554
    transformations: [
      (args: any) => {
        if (["aws:ec2/vpc:Vpc", "aws:ec2/subnet:Subnet"].includes(args.type)) {
          return {
            props: args.props,
            opts: pulumi.mergeOptions(args.opts, { ignoreChanges: ["tags"] }),
          }
        }
        return
      },
    ],
  }
)

/** Stack outputs: https://www.pulumi.com/learn/building-with-pulumi/stack-outputs/ */
export const vpcId = vpc.id
export const vpcPublicSubnetIds = vpc.publicSubnetIds
export const vpcPrivateSubnetIds = vpc.privateSubnetIds

/** Create the EKS cluster. The cluster will be created in the new vpc. The
 * autoscaling group will spin up 2 cluster nodes (EC2 instances) where they
 * will be distributed across our 2 private subnets. Each subnet is in 1 of 2
 * vpc zones.
 */
const cluster = new eks.Cluster(projectStack, {
  vpcId: vpc.id,
  publicSubnetIds: vpc.publicSubnetIds,
  privateSubnetIds: vpc.privateSubnetIds,
  // At time of writing we found this instance type to be adequate
  instanceType: "t3.large",
  // Set `minSize` and `desiredCapacity` to 0 if you ever want to pause your
  // cluster's workload.
  minSize: 2,
  desiredCapacity: 2,
})

/** Stack outputs: https://www.pulumi.com/learn/building-with-pulumi/stack-outputs/ */
export const clusterName = cluster.eksCluster.name
export const clusterId = cluster.eksCluster.id
export const clusterVersion = cluster.eksCluster.version
export const clusterStatus = cluster.eksCluster.status
export const kubeconfig = pulumi.secret(cluster.kubeconfig)

/**
 * The default gp2 storage class on EKS doesn't allow for volumes to be
 * expanded. Create a storage class here that allows for expansion.
 *
 * https://www.jeffgeerling.com/blog/2019/expanding-k8s-pvs-eks-on-aws
 */
const gp2ExpansionStorageClass = new k8s.storage.v1.StorageClass(
  "gp2-volume-expansion",
  {
    provisioner: "kubernetes.io/aws-ebs",
    allowVolumeExpansion: true,
    parameters: {
      type: "gp2",
      fsType: "ext4",
    },
    volumeBindingMode: "WaitForFirstConsumer",
    reclaimPolicy: "Delete",
    metadata: {
      name: "gp2-volume-expansion",
    },
  },
  { provider: cluster.provider, parent: cluster }
)

/** We will use the cluster instance role as the default role to attach policies
 * to. In our tutorial, the only policy will be the alb controller policy. */
const clusterInstanceRoles = cluster.instanceRoles.apply((roles) => roles)
const defaultIamRole = clusterInstanceRoles[0]

/**
 * Deploy the AWS load balancer controller to manage the creation of the load
 * balancers that expose your Tezos node. An application load balancer will be
 * created for the RPC ingress. The IAM policy created for the controller is
 * attached to the default cluster node role.
 *
 *  https://github.com/kubernetes-sigs/aws-load-balancer-controller
 */
const albController = new tezos.aws.AlbIngressController(
  {
    clusterName: cluster.eksCluster.name,
    iamRole: defaultIamRole,
  },
  { provider: cluster.provider, parent: cluster }
)

const namespace = "mainnet"
/** Create the k8s namespace to deploy resources into */
const mainnetNamespace = new k8s.core.v1.Namespace(
  namespace,
  { metadata: { name: namespace } },
  { provider: cluster.provider, parent: cluster }
)

/** Deploy the tezos-k8s Helm chart into the mainnet namespace. This will create
 * the Tezos rolling node amongst other things. */
const helmChart = new tezos.TezosK8sHelmChart(
  `${namespace}-tezos-aws`,
  {
    namespace,
    // The path to a Helm values.yaml file
    valuesFiles: "./values.yaml",
    // The latest tezos-k8s version as of the time of this writing.
    version: "6.0.1",
  },
  {
    provider: cluster.provider,
    parent: mainnetNamespace,
  }
)

/** Create the RPC ingress to expose your node's RPC endpoint. The alb
 * controller will create an application load balancer. */
const rpcIngress = new tezos.aws.RpcIngress(
  `${namespace}-rpc-ingress`,
  { metadata: { name: `${namespace}-rpc-ingress`, namespace } },
  {
    provider: cluster.provider,
    dependsOn: albController.chart.ready,
    parent: mainnetNamespace,
  }
)
3 Deployment
Now it's time to deploy our Tezos infrastructure!
Run the following command to launch your cluster:
pulumi up
You may probably have to execute the following command, before launching the cluster. Chose your prefered AWS region (us-east-2
for Ohio, eu-central-1 for Frankfurt, etc.):
pulumi config set region
Pulumi will display a url that you can visit to view the status of your deployment on the Pulumi web console.
4 Monitoring
In order to monitor the cluster liveness, we have chosen Lens (An IDE for Kubernetes) as a monitoring tool.
Execute the following command to provide the kubeconfig file to Lens:
pulumi stack output kubeconfig --show-secrets --json > kubeconfig.json
Now, you can graphically monitor your cluster liveness (in our case, our 3 rolling nodes):
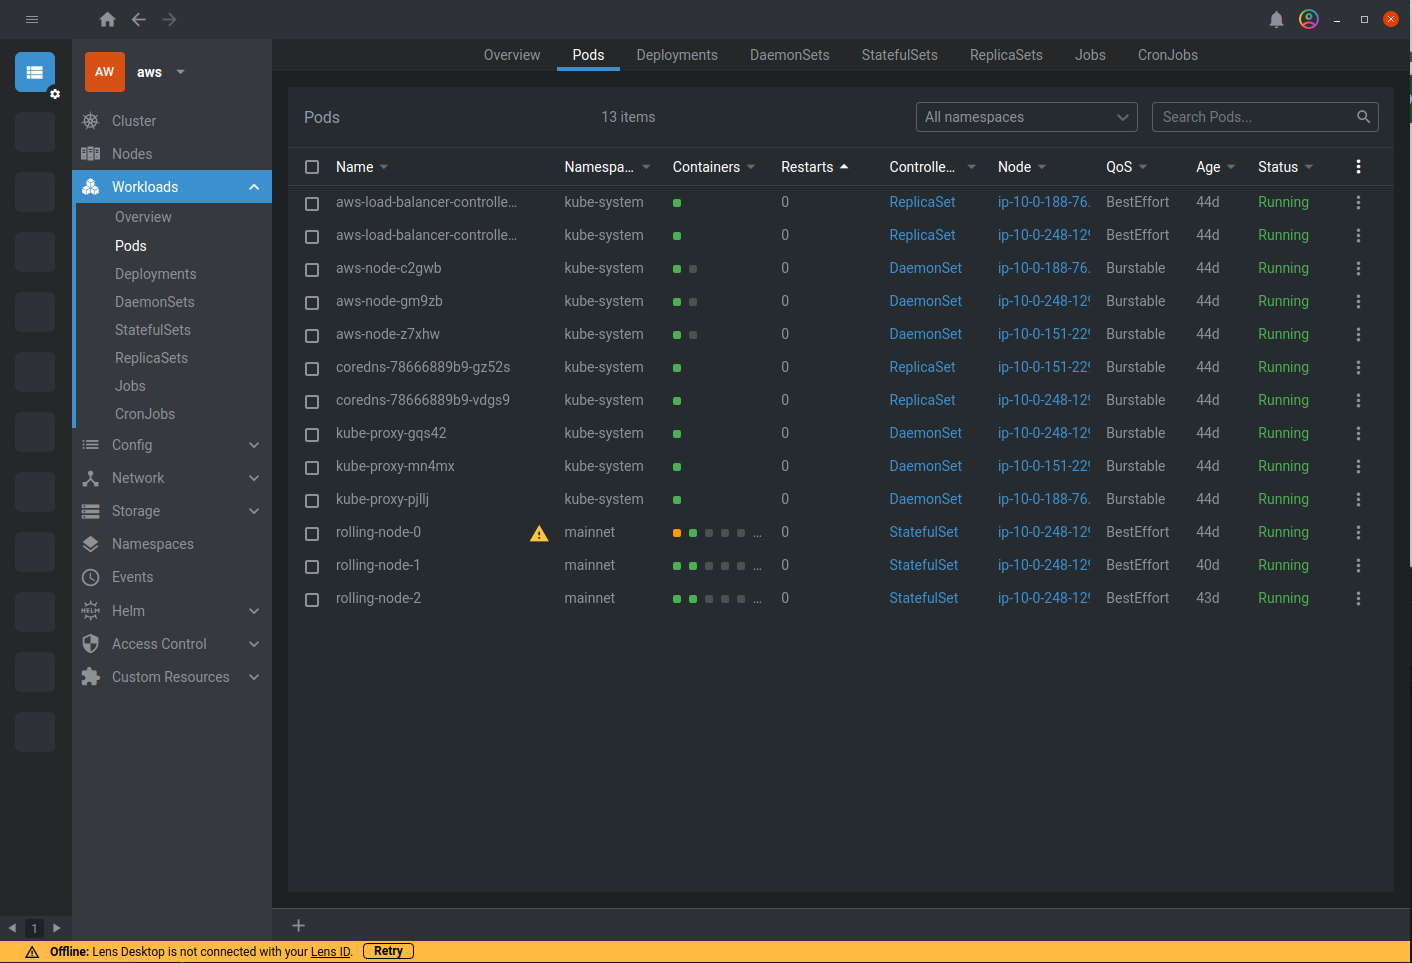
Note that by clicking on the load balancer, you will find its url. Let’s curl it in a terminal to get the Mainnet chain id:
curl http://<ADDRESS>/chains/main/chain_id
"NetXdQprcVkpaWU"
The <ADDRESS> RPC endpoint is a URL generated by AWS. It is possible to deploy the RPC behind a specific domain name. This would require buying or importing a domain and configuring it with Route53.
k9s can also be used, instead of Lens, to monitor your cluster via CLI. As above, the following lines allow providing the config and launch k9s:
# Get the cluster's kubeconfig and save it to a file

pulumi stack output kubeconfig --show-secrets --json > kubeconfig.json

# Set the KUBECONFIG environment variable to point k9s to our kubeconfig.

export KUBECONFIG=./kubeconfig.json

# Let's get into our cluster!

k9s
Congratulations! Now you have your own cluster of Tezos nodes, running on AWS cloud, and exposed to the internet! 🎉
Launch with minikube
You can also deploy your cluster with minikube using k8s. This tutorial aims to be a practical guide to deploying your own cluster of Tezos nodes using minikube. For further technical explanations, we refer you to the tezos-k8s official documentation.