CLI and RPC
A list of community-run nodes can be found here.
In this chapter, the reader will learn how to install the official "octez-client" and "octez-admin-client" applications and run them using the Command Line Interface. These commands call on the remote procedures of a Tezos node (local or remote). There are many commands, but we'll see some examples.
Connecting to the network
The octez-client and Tezos RPC need to connect to a Tezos node. You can connect to your own tezos node, or you can use a community node. In both cases, you can set it for the mainnet or the testnet.
You can find a list of community nodes here.
If you use a testnet, you are going to need free test tez which you can get here.
Tezos RPC (Remote Procedure Call)
RPC[1] is a client-server protocol where the requesting program is the client and the program providing the service is the server.
Tezos nodes provide a JSON/RPC interface to interact with the Tezos network. Although it uses RPC and is JSON-based, it does not follow the JSON-RPC protocol.
A complete list of calls is available here. Make sure to check the protocol version before you use these calls. The available calls in the Seoul protocol are here.
RPC examples
GET 'block'
This call returns all the information about a block. But the associated metadata may not be present, it depends on the history mode and block's distance from the head.
GET [node_url]/chains/[chain_id]/blocks/[block_id]
Here is an example, of how to get the block number 3000000 from the mainnet using ECAD Labs node:
curl https://mainnet.api.tez.ie/chains/main/blocks/3000000
To test this call, simply click the address above (or copy-paste it, to open it in your web browser). You'll discover a pretty long JSON object. Depending on the used browser, the visualization may be better (e.g. Firefox will format the appearance to make it easier to read).
GET 'contract storage'
This call accesses the storage of a contract.
GET [node_url]/chains/[chain_id]/blocks/[block_id]/context/contracts/[contract_id]/storage
Example to get the storage of contract KT1Hkg5qeNhfwpKW4fXvq7HGZB9z2EnmCCA9 from block 3000000 on the mainnet using ECAD Labs node:
curl https://mainnet.api.tez.ie/chains/main/blocks/3000000/context/contracts/KT1Hkg5qeNhfwpKW4fXvq7HGZB9z2EnmCCA9/storage
You can test this call exactly the same way as the "GET block" call.
octez-client (CLI)
octez-client is the official client to interact with a Tezos node via RPC. Let's take a look at the installation and some examples.
How to install the octez-client
On Mac OS with Homebrew
brew tap serokell/tezos-packaging-stable https://github.com/serokell/tezos-packaging-stable.git
brew install octez-client
On Linux with binaries
We support the following distribution/releases: - debian/bookworm - ubuntu/noble - ubuntu/jammy
export distribution=debian
export release=bookworm
and run:
  apt-get install -y sudo gpg curl

  curl "https://packages.nomadic-labs.com/$distribution/octez.asc" |
    sudo gpg --dearmor -o /etc/apt/trusted.gpg.d/octez.gpg
  echo "deb [arch=amd64] https://packages.nomadic-labs.com/$distribution $release main" |
    sudo tee /etc/apt/sources.list.d/octez.list
  sudo apt-get update
  sudo apt-get install -y octez-client
On Fedora with binaries
dnf copr enable -y @Serokell/Tezos && dnf update -y
dnf install -y tezos-client
From sources with OPAM
Connection to a node
Below we'll connect to a community node (https://ghostnet.tezos.marigold.dev) on the Ghostnet testnet. We'll use the --endpoint parameter to update the configuration of the Octez Client on a Ubuntu system:
octez-client --endpoint https://ghostnet.tezos.marigold.dev config update
The result should look like the lines below:
Warning:

                 This is NOT the Tezos Mainnet.

           Do NOT use your fundraiser keys on this network.
On Ubuntu, the config file should be written in "/.octez-client/config" under your "home" folder. For example after the last command, the all new "config" file look like this (with Nano):
{ "base_dir": "/home/userName/.octez-client",
  "endpoint": "https://ghostnet.tezos.marigold.dev", "web_port": 8080,
  "confirmations": 0 }
Account funding
To get free tez on testnet, you must first have generated a tezos account. If not, you can generate one with the following command:
octez-client gen keys my_account
You can now retrieve the generated address (the hash of the public key, it starts with tz1, tz2, tz3 or tz4) with the command:
octez-client show address my_account
The result should look like:
Warning:

                 This is NOT the Tezos Mainnet.

           Do NOT use your fundraiser keys on this network.

Hash: tz1VvyNvPUdypHaTgznTLSkumj9YMZxpmB9p
Public Key: edpkufA6kH6hw4ckZWWmYuLZpfwfXc9abiaEDLqH2iviFXnK9N4oct
You can now go to the testnets website, select your testnet faucet and request tez!
Octez Client user manual and version
For global options
octez-client --help
For command options
octez-client [global options] command --help
For version information
octez-client --version
On Ubuntu, the result would look like the following:
763259c5 (2022-12-01 10:20:58 +0000) (23.2)
The full commands' list on Octez client is available here.
Octez Client examples
Get balance
Get the balance of an account:
octez-client get balance for [account_id]
Example with our previously registered user "my_account":
octez-client get balance for my_account
The response:
Warning:

                 This is NOT the Tezos Mainnet.

           Do NOT use your fundraiser keys on this network.

1 ꜩ
The previous response is also a way of checking if the account is activated on the testnet (first transfer).
Get timestamp
Get the UTC of the latest downloaded block. Keep in mind, timezones may differ from your local time:
octez-client get timestamp
Result example:
Warning:

                 This is NOT the Tezos Mainnet.

           Do NOT use your fundraiser keys on this network.

2022-10-04T13:34:00Z
List known addresses
This call only lists registered implicit accounts in your Octez client.
octez-client list known addresses
Example response:
Warning:

                 This is NOT the Tezos Mainnet.

           Do NOT use your fundraiser keys on this network.

my_account: tz1VvyNvPUdypHaTgznTLSkumj9YMZxpmB9p (unencrypted sk known)
List known contracts
This call lists all registered accounts, implicit and originated in your Octez client.
octez-client list known contracts
Our example:
Warning:

                 This is NOT the Tezos Mainnet.

           Do NOT use your fundraiser keys on this network.

my_account: tz1VvyNvPUdypHaTgznTLSkumj9YMZxpmB9p
Everything is correct: We don't have any originated account and only one implicit account!
Transfers and receipts
The command below transfers 42 ꜩ from the account user1 to user2 (you can use a Tezos addresses directly):
octez-client transfer 42 from user1 to user2
Notice that you can specify the maximum fee for this operation appending, "--fee-cap" (defaults to 1.0). The network would determine the actual fee, lower than this cap:
octez-client transfer 42 from user1 to user2 --fee-cap 0.9
You can also add "--dry-run" or "-D" if you want to test and display the transaction without finalizing it.
For our example, let's generate another account and feed it with tez from the faucet website:
$ octez-client gen keys my_account_2
$ octez-client show address my_account_2
Hash: tz1M9Snt3Sdcv9YkTrergj3ar6FuQ2g4T9y3
Public Key: edpktfqbZHfRRSRcJ86hqxQZvgfFMLwR6zMZAXA5UgE81L7WqHt579
Let's verify the balance (and activation):
octez-client get balance for my_account_2
Response (without the warning message):
2 ꜩ
Let's finally try a transfer of 1.5 ꜩ from my_account_2 to my_account with a 0.5 ꜩ fee cap:
octez-client transfer 1.5 from my_account_2 to my_account --fee-cap 0.5
Response (without the warning message) should be:
Node is bootstrapped.
Estimated storage: no bytes added
Estimated gas: 1000.040 units (will add 0 for safety)
Estimated storage: no bytes added
Operation successfully injected in the node.
Operation hash is 'oocBxnYDf8qiT3EmRFZxR9axGKqEJMxWnFAnzN5Dwz8QFxUe89Z'
Waiting for the operation to be included...
Operation found in block: BLzxBbdk1yq61Z3U36652RBxMM6PMfitA53Rk3xFiZpMX9yQZVa (pass: 3, offset: 0)
This sequence of operations was run:
  Manager signed operations:
    From: tz1M9Snt3Sdcv9YkTrergj3ar6FuQ2g4T9y3
    Fee to the baker: ꜩ0.00036
    Expected counter: 12102064
    Gas limit: 1000
    Storage limit: 0 bytes
    Balance updates:
      tz1M9Snt3Sdcv9YkTrergj3ar6FuQ2g4T9y3 ... -ꜩ0.00036
      payload fees(the block proposer) ....... +ꜩ0.00036
    Revelation of manager public key:
      Contract: tz1M9Snt3Sdcv9YkTrergj3ar6FuQ2g4T9y3
      Key: edpktfqbZHfRRSRcJ86hqxQZvgfFMLwR6zMZAXA5UgE81L7WqHt579
      This revelation was successfully applied
      Consumed gas: 1000
  Manager signed operations:
    From: tz1M9Snt3Sdcv9YkTrergj3ar6FuQ2g4T9y3
    Fee to the baker: ꜩ0.000258
    Expected counter: 12102065
    Gas limit: 1001
    Storage limit: 0 bytes
    Balance updates:
      tz1M9Snt3Sdcv9YkTrergj3ar6FuQ2g4T9y3 ... -ꜩ0.000258
      payload fees(the block proposer) ....... +ꜩ0.000258
    Transaction:
      Amount: ꜩ1.5
      From: tz1M9Snt3Sdcv9YkTrergj3ar6FuQ2g4T9y3
      To: tz1VvyNvPUdypHaTgznTLSkumj9YMZxpmB9p
      This transaction was successfully applied
      Consumed gas: 1000.040
      Balance updates:
        tz1M9Snt3Sdcv9YkTrergj3ar6FuQ2g4T9y3 ... -ꜩ1.5
        tz1VvyNvPUdypHaTgznTLSkumj9YMZxpmB9p ... +ꜩ1.5

The operation has only been included 0 blocks ago.
We recommend to wait more.
Use command
  octez-client wait for oocBxnYDf8qiT3EmRFZxR9axGKqEJMxWnFAnzN5Dwz8QFxUe89Z to be included --confirmations 1 --branch BLngFFgWJ1TJUgPTp4CLvnyGFzwhKrpcazRFysptBmhZKKH4w94
and/or an external block explorer.
Let's check both balances (testnet warning messages removed):
$ octez-client get balance for my_account
2.5 ꜩ

$ octez-client get balance for my_account_2
0.499382 ꜩ
Everything is fine.
You can observe your actions on explorers like tzkt or tzstats:
OpenTezos has a dedicated module on how to use an explorer.
Demonstrate ownership of a tz address
To prove that one owns a specific tz address, several options are possible.
Option 1:
Ask the wallet owner to send a transaction to a specific wallet with a specific amount. The risk of this method is that the verification happens on-chain, publicly and it involves transaction fees.
Option 2:
Choosing the data to sign
The octez-client enables that. Let's prove that an address is indeed the owner of a given address.
The first step is to pick the data we want the owner to sign (the choice of the data to be signed is arbitrary). Let's take the ID of an Hic et Nunc NFT, for example: OBJKT#63886, and
convert the data to hexadecimal to provide to the octez-client.
We now need to transform the ID OBJKT#63886 into hexadecimal format. To do so, we can use a website like: https://www.convertstring.com/,
or the following bash script (written in a file, in our case string-to-hex.sh):
#!/bin/bash
# content of string-to-hex.sh

echo '0x'"`echo $1 | hexdump -vC |  awk 'BEGIN {IFS="\t"} {$1=""; print }' | awk '{sub(/\|.*/,"")}1'  | tr -d '\n' | tr -d ' '`" | rev | cut -c 3- | rev
Usage:
> chmod +x string-to-hex.sh
> ./string-to-hex.sh OBJKT#63886
0x4f424a4b542332333438
Sign the data with the octez-client
The owner will have to sign the corresponding hexadecimal result with the octez-client.
> octez-client sign bytes 0x4f424a4b542332333438 for <OWNER_ADDRESS_ALIAS>
Signature: edsigtmihaqxqsbT5DRM39PaofMD9ibfNQgtVZFAmno1EtmFo8Co51nu9udgsepbSHhZNuntvpSGTCjksF3pssFvmRvPR3msEwi
Verifying the signature
Find the owner's address public key
To be able to verify the owner's signature, you need to retrieve its public key, by:
either ask the owner directly if he knows how to find it,
or retrieve it yourself from an explorer by looking for the "Reveal key" operation of the owner's address.
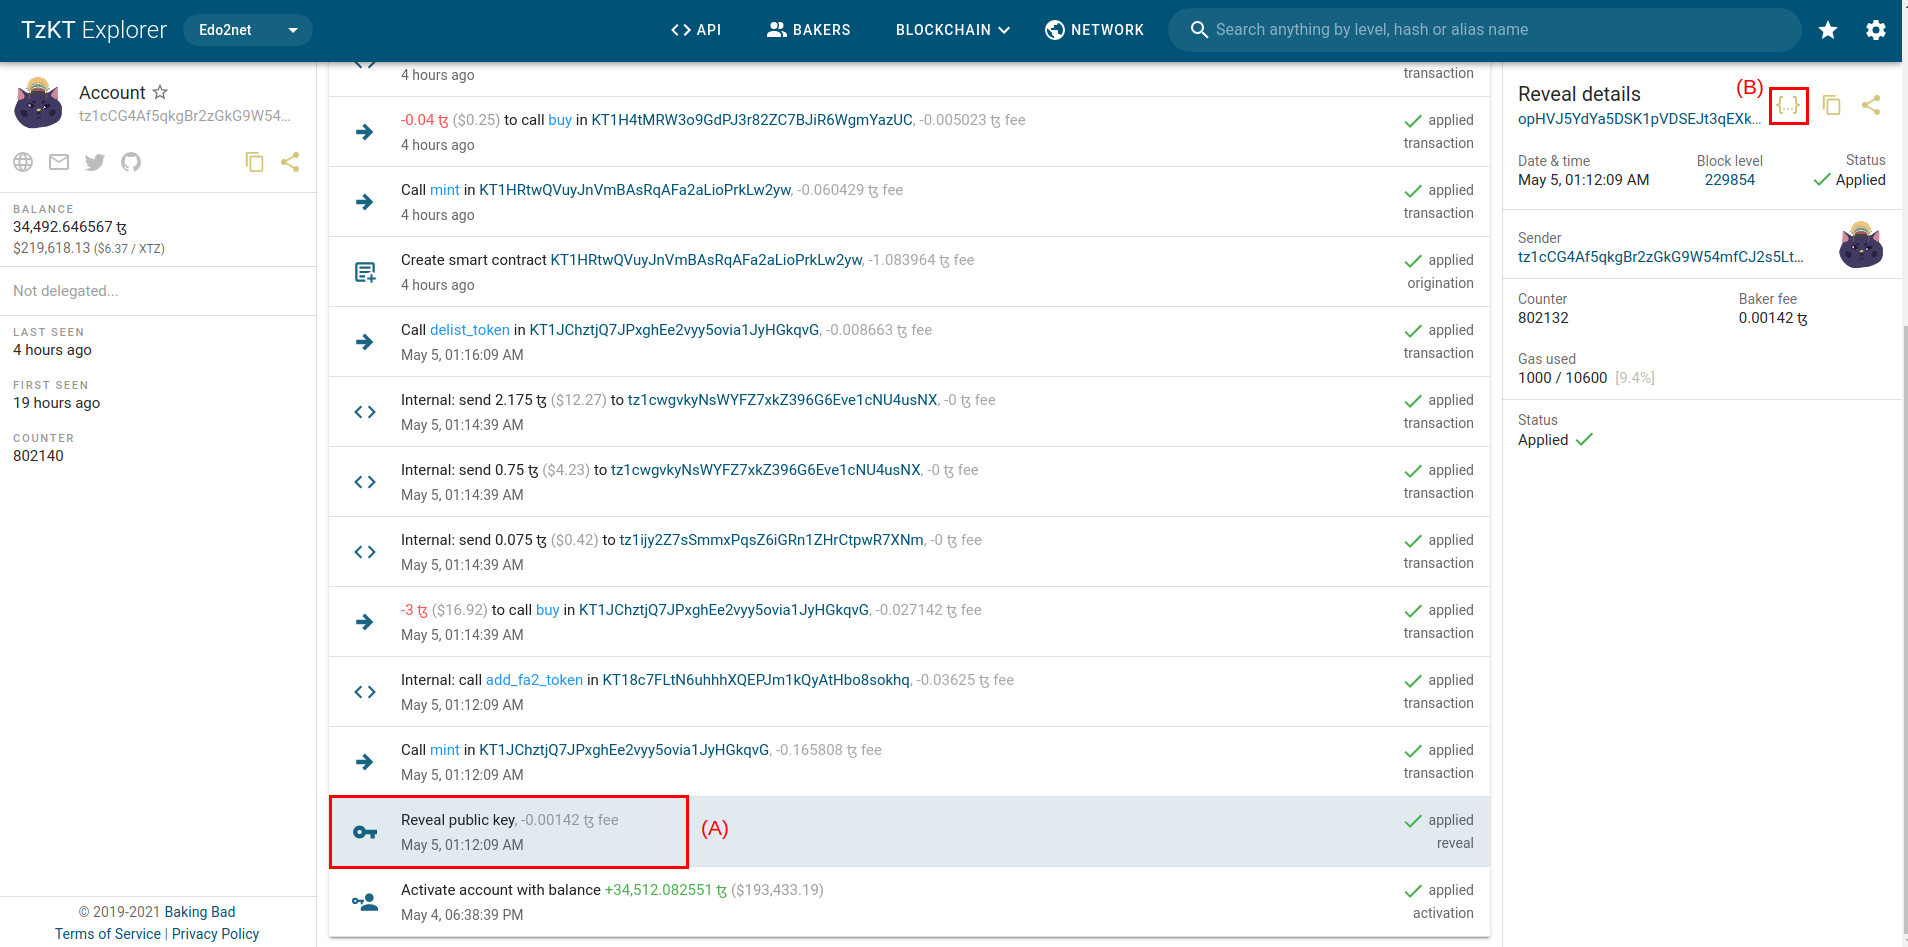
Let's retrieve it ourselves on Tzkt:
- Go to the wallet page (in our case: https://edo2net.tzkt.io/tz1cCG4Af5qkgBr2zGkG9W54mfCJ2s5Ltmyq/operations/), and look for one of the first operations called "Reveal key" as in the example below. Once you find it, click on the brackets highlighted on the screenshot below, located at the top right of the page.
- Once you open the JSON you should be able to see the public key like in the screenshot below
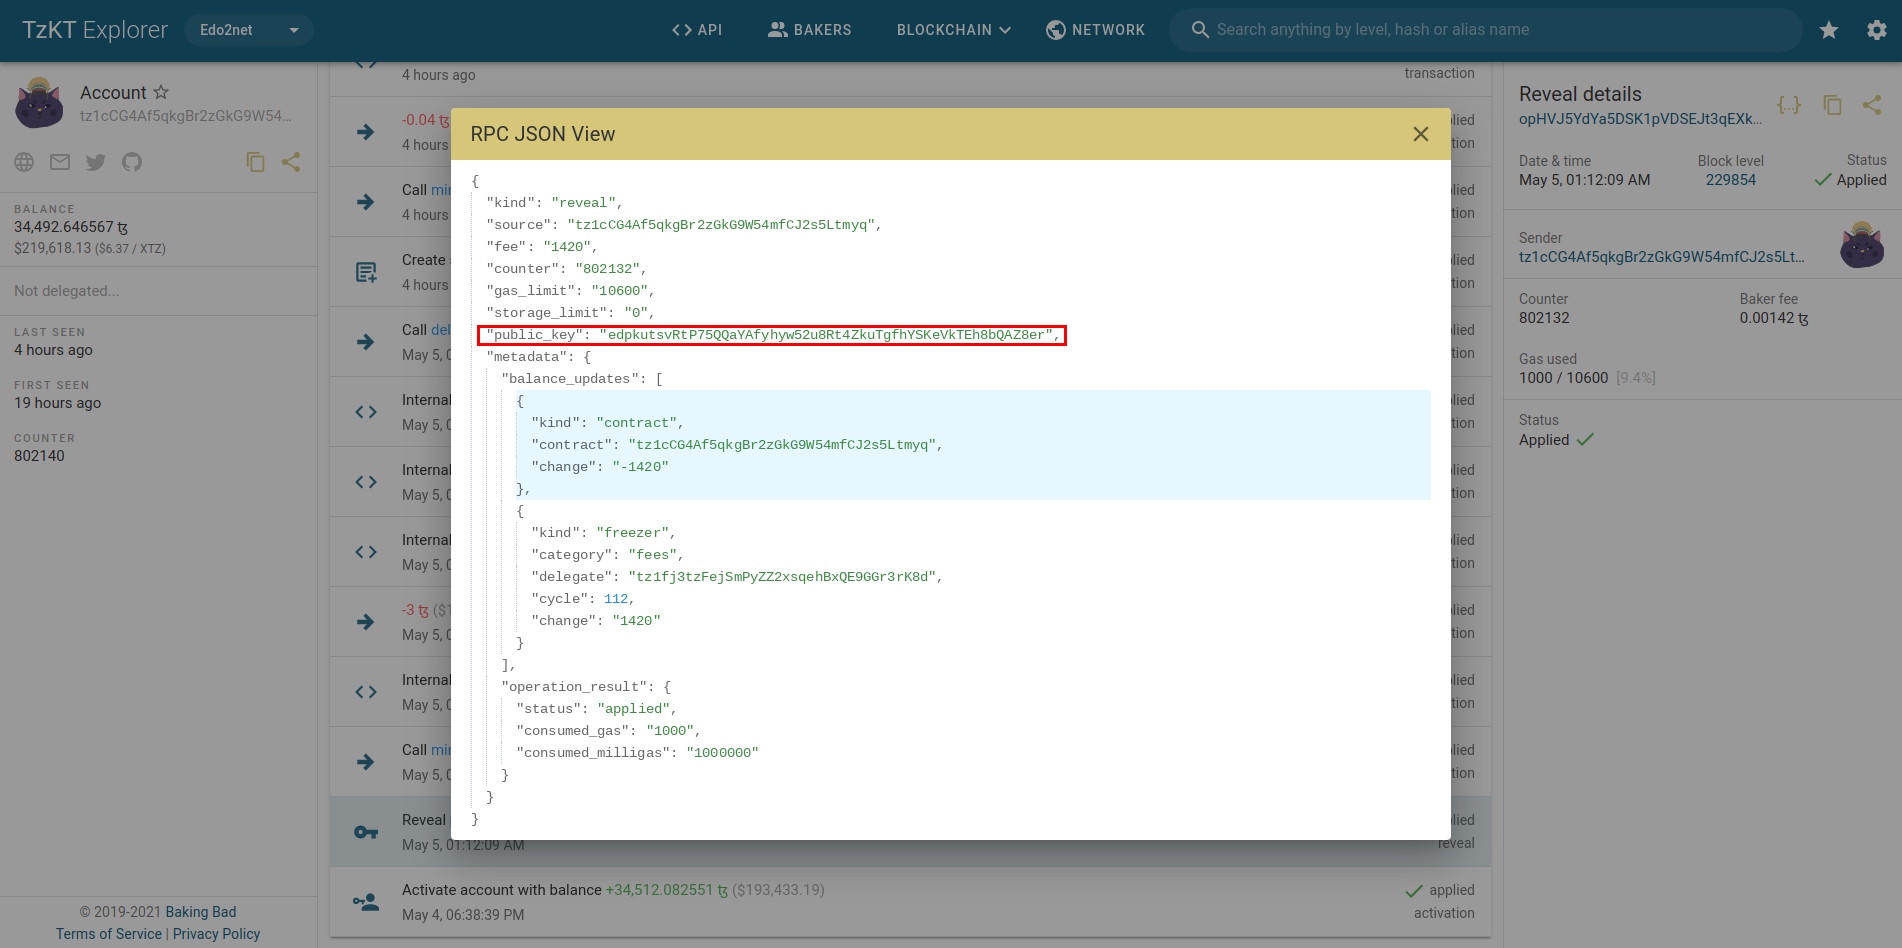
Import the owner's public key on the octez-client
Import the owner's public key on your octez-client with the following command:
(We used the ID of the Hic et Nunc object with the "_SIGNER" suffix as an alias to import the SIGNER's public key)
> octez-client import public key OBJKT#63886_SIGNER unencrypted:edpkutsvRtP75QQaYAfyhyw52u8Rt4ZkuTgfhYSKeVkTEh8bQAZ8er
Verify the signature
The final step is to verify that the signature matches the signer's public key:
> octez-client check that 0x4f424a4b542332333438 was signed by OBJKT#63886_SIGNER to produce edsigtmihaqxqsbT5DRM39PaofMD9ibfNQgtVZFAmno1EtmFo8Co51nu9udgsepbSHhZNuntvpSGTCjksF3pssFvmRvPR3msEwi
Signature check successful.
Octez Admin Client
The admin client allows you to interact with the peer-to-peer layer:
- to check the status of the connections
- to force connections to known peers
- to ban/un-ban peers
To use the octez-admin-client commands, we need a node we can administer. In the above examples, we learned how to use remote community nodes. Let's now install a local node, we can pretend to be an administrator. This section will also be useful to follow along the Deploy a Node module.
We'll need several prerequisites. Main ones are Docker and Flextesa.
For the demonstration, the installations will take place on a fresh Ubuntu 20.04 (x86_64/amd64 system minimal installation).
Basic programs
To avoid any shortage, install curl and build-essential:
sudo apt update && sudo apt install curl build-essential -y
Docker
Ubuntu's official guide here. For other systems please refer to the guides here.
Use the commands to allow APT to use repository over HTTPS
sudo apt update && sudo apt install apt-transport-https ca-certificates gnupg lsb-release -y
Add the Docker's official GPG key
curl -fsSL https://download.docker.com/linux/ubuntu/gpg | sudo gpg --dearmor -o /usr/share/keyrings/docker-archive-keyring.gpg
Set the stable repository
echo "deb [arch=amd64 signed-by=/usr/share/keyrings/docker-archive-keyring.gpg] https://download.docker.com/linux/ubuntu $(lsb_release -cs) stable" | sudo tee /etc/apt/sources.list.d/docker.list > /dev/null
Install Docker Engine
sudo apt update && sudo apt install docker-ce docker-ce-cli containerd.io -y
Verify Docker installation
The following command test your installation:
sudo docker run hello-world
Modify the system "docker" group
sudo usermod -a -G docker $USER
At this point, please save your work and reboot the system.
Flextesa Tezos Sandbox
Thanks to Docker, the following command integrates Flextesa (a Tezos local test chain) and will start the Tezos sandbox in the background:
image=oxheadalpha/flextesa:latest
script=ithacabox
docker run --rm --name my-sandbox --detach -p 20000:20000 \
       -e block_time=3 \
       "$image" "$script" start
Notice the port number set on 20000. After downloading images, the node should start in the background.
Let's bootstrap our new node and change our connection for it:
octez-client --endpoint http://localhost:20000 bootstrapped
octez-client --endpoint http://localhost:20000 config update
The sandbox also set two accounts. You can access their information with the following command:
docker exec my-sandbox $script info
You should get something like the following result:
Usable accounts:

- alice
  * edpkvGfYw3LyB1UcCahKQk4rF2tvbMUk8GFiTuMjL75uGXrpvKXhjn
  * tz1VSUr8wwNhLAzempoch5d6hLRiTh8Cjcjb
  * unencrypted:edsk3QoqBuvdamxouPhin7swCvkQNgq4jP5KZPbwWNnwdZpSpJiEbq
- bob
  * edpkurPsQ8eUApnLUJ9ZPDvu98E8VNj4KtJa1aZr16Cr5ow5VHKnz4
  * tz1aSkwEot3L2kmUvcoxzjMomb9mvBNuzFK6
  * unencrypted:edsk3RFfvaFaxbHx8BMtEW1rKQcPtDML3LXjNqMNLCzC3wLC1bWbAt

Root path (logs, chain data, etc.): /tmp/mini-box (inside container).
To use them, we need to import them:
octez-client import secret key alice unencrypted:edsk3QoqBuvdamxouPhin7swCvkQNgq4jP5KZPbwWNnwdZpSpJiEbq --force
octez-client import secret key bob unencrypted:edsk3RFfvaFaxbHx8BMtEW1rKQcPtDML3LXjNqMNLCzC3wLC1bWbAt --force
To check the accounts' activation, let's check their balances:
octez-client get balance for alice
octez-client get balance for bob
They should both have 2,000,000 ꜩ.
See The Documenation for more Flextesa examples.
Let's now install the octez-admin-client application.
How to install the octez-admin-client
On Mac OS with Homebrew
brew install octez-admin-client
On Ubuntu with binaries
sudo add-apt-repository ppa:serokell/tezos && sudo apt update && apt install octez-admin-client -y
On Fedora with binaries
dnf copr enable -y @Serokell/Tezos && dnf update -y
dnf install -y octez-admin-client
From sources with OPAM
Admin-client use manual and version
Global options
octez-admin-client --help
Command options
octez-admin-client [global options] command --help
Version information
octez-admin-client --version
The complete listing of commands on octez-admin-client is available here.
We can finally try a few commands on our node.
Admin-client commands examples
Lists remote procedure calls under a given URL prefix
octez-admin-client rpc list [URL]
In our example:
octez-admin-client rpc list /chains/main/blocks
Would produce:
Available services:

  - GET /chains/main/blocks
      Lists block hashes from '<chain>', up to the last checkpoint, sorted
      with decreasing fitness. Without arguments it returns the head of the
      chain. Optional arguments allow returning the list of predecessors of a
      given block or of a set of blocks.
  - /chains/main/blocks/<block_id> <dynamic>


Dynamic parameter description:

  <block_id>
      A block identifier. This is either a block hash in Base58Check
      notation, one the predefined aliases: 'genesis', 'head' or a block
      level (index in the chain). One might also use 'head~N' or '<hash>~N'
      where N is an integer to denote the Nth predecessor of the designated
      block.Also, '<hash>+N' denotes the Nth successor of a block.
RPC with the GET method
octez-admin-client rpc get [url]
In our example, if we want the blocks:
octez-admin-client rpc get /chains/main/blocks
We get something like:
[ [ "BLXn8BL5mEUj4BMgh6DdSRShdmnVtz1pSVrtgkJ7WAKcXHpLj9H" ] ]
Now, if we'd like to have more details on this particular block:
octez-admin-client rpc get /chains/main/blocks/BLXn8BL5mEUj4BMgh6DdSRShdmnVtz1pSVrtgkJ7WAKcXHpLj9H
As a result, we obtain a long JSON descriptive object:
{ "protocol": "PsFLorenaUUuikDWvMDr6fGBRG8kt3e3D3fHoXK1j1BFRxeSH4i",
  "chain_id": "NetXfpUfwJdBox9",
  "hash": "BLXn8BL5mEUj4BMgh6DdSRShdmnVtz1pSVrtgkJ7WAKcXHpLj9H",
  "header":
    { "level": 393, "proto": 1,
      "predecessor": "BKu6mYuq2XHEM6RWGUZezodwMe32FLPECB6jF9xBQgHwedwXZkV",
      "timestamp": "2021-05-25T15:28:42Z", "validation_pass": 4,
      "operations_hash":
        "LLoZjCet4uU586xmdQyAdXJFSs8NjgwxSsbNo9hVYHfVyQm2iXrSL",
      "fitness": [ "01", "0000000000000188" ],
      "context": "CoUtK2oqBmhT4iR4ahpDyK1ZQetnUrqKCGSeKMD13hpwaP63oYxT",
      "priority": 0, "proof_of_work_nonce": "756e6b6e00000000",
      "signature":
        "sigg9EpfsEkHCQuHMvc9Bx5DbF3w9msCXkY4C5P4DE54coPZQrA53ACY62Mzq7V5hM1nRgGVdxXhhPNTcsy4Qwe61fiLDPYr" },
  "metadata":
    { "protocol": "PsFLorenaUUuikDWvMDr6fGBRG8kt3e3D3fHoXK1j1BFRxeSH4i",
      "next_protocol": "PsFLorenaUUuikDWvMDr6fGBRG8kt3e3D3fHoXK1j1BFRxeSH4i",
      "test_chain_status": { "status": "not_running" },
      "max_operations_ttl": 60, "max_operation_data_length": 32768,
      "max_block_header_length": 238,
      "max_operation_list_length":
        [ { "max_size": 4194304, "max_op": 2048 }, { "max_size": 32768 },
          { "max_size": 135168, "max_op": 132 }, { "max_size": 524288 } ],
      "baker": "tz1YPSCGWXwBdTncK2aCctSZAXWvGsGwVJqU",
      "level":
        { "level": 393, "level_position": 392, "cycle": 49,
          "cycle_position": 0, "voting_period": 24,
          "voting_period_position": 8, "expected_commitment": false },
      "level_info":
        { "level": 393, "level_position": 392, "cycle": 49,
          "cycle_position": 0, "expected_commitment": false },
      "voting_period_kind": "proposal",
      "voting_period_info":
        { "voting_period":
            { "index": 24, "kind": "proposal", "start_position": 384 },
          "position": 8, "remaining": 7 }, "nonce_hash": null,
      "consumed_gas": "0", "deactivated": [],
      "balance_updates":
        [ { "kind": "contract",
            "contract": "tz1YPSCGWXwBdTncK2aCctSZAXWvGsGwVJqU",
            "change": "-512000000", "origin": "block" },
          { "kind": "freezer", "category": "deposits",
            "delegate": "tz1YPSCGWXwBdTncK2aCctSZAXWvGsGwVJqU", "cycle": 49,
            "change": "512000000", "origin": "block" },
          { "kind": "freezer", "category": "rewards",
            "delegate": "tz1YPSCGWXwBdTncK2aCctSZAXWvGsGwVJqU", "cycle": 49,
            "change": "40000000", "origin": "block" } ] },
  "operations":
    [ [ { "protocol": "PsFLorenaUUuikDWvMDr6fGBRG8kt3e3D3fHoXK1j1BFRxeSH4i",
          "chain_id": "NetXfpUfwJdBox9",
          "hash": "oo2TDxCHBoYXVkzaxJZPXuAA9o27QzA8RRdw6YYuaUv1hxeurjU",
          "branch": "BKu6mYuq2XHEM6RWGUZezodwMe32FLPECB6jF9xBQgHwedwXZkV",
          "contents":
            [ { "kind": "endorsement_with_slot",
                "endorsement":
                  { "branch":
                      "BKu6mYuq2XHEM6RWGUZezodwMe32FLPECB6jF9xBQgHwedwXZkV",
                    "operations": { "kind": "endorsement", "level": 392 },
                    "signature":
                      "sigVdHfmCxmj9z7WxvwPEiA9mnGZk5k2RNfyaj6z7nBoX7UusUMCtyZDC4bCbKGg557BCr2T41cB4SCpytQyJqxKAukgV6NL" },
                "slot": 0,
                "metadata":
                  { "balance_updates":
                      [ { "kind": "contract",
                          "contract": "tz1YPSCGWXwBdTncK2aCctSZAXWvGsGwVJqU",
                          "change": "-2048000000", "origin": "block" },
                        { "kind": "freezer", "category": "deposits",
                          "delegate": "tz1YPSCGWXwBdTncK2aCctSZAXWvGsGwVJqU",
                          "cycle": 48, "change": "2048000000",
                          "origin": "block" },
                        { "kind": "freezer", "category": "rewards",
                          "delegate": "tz1YPSCGWXwBdTncK2aCctSZAXWvGsGwVJqU",
                          "cycle": 48, "change": "40000000",
                          "origin": "block" } ],
                    "delegate": "tz1YPSCGWXwBdTncK2aCctSZAXWvGsGwVJqU",
                    "slots":
                      [ 0, 1, 2, 3, 4, 5, 6, 7, 8, 9, 10, 11, 12, 13, 14, 15,
                        16, 17, 18, 19, 20, 21, 22, 23, 24, 25, 26, 27, 28,
                        29, 30, 31 ] } } ] } ], [], [], [] ] }
Listing protocols known by the node
octez-admin-client list protocols
Example result:
ProtoALphaALphaALphaALphaALphaALphaALphaALphaDdp3zK
ProtoDemoCounterDemoCounterDemoCounterDemoCou4LSpdT
ProtoDemoNoopsDemoNoopsDemoNoopsDemoNoopsDemo6XBoYp
ProtoGenesisGenesisGenesisGenesisGenesisGenesk612im
Ps9mPmXaRzmzk35gbAYNCAw6UXdE2qoABTHbN2oEEc1qM7CwT9P
PsBABY5HQTSkA4297zNHfsZNKtxULfL18y95qb3m53QJiXGmrbU
PsBabyM1eUXZseaJdmXFApDSBqj8YBfwELoxZHHW77EMcAbbwAS
PsCARTHAGazKbHtnKfLzQg3kms52kSRpgnDY982a9oYsSXRLQEb
PsDELPH1Kxsxt8f9eWbxQeRxkjfbxoqM52jvs5Y5fBxWWh4ifpo
PsFLorenaUUuikDWvMDr6fGBRG8kt3e3D3fHoXK1j1BFRxeSH4i
PsYLVpVvgbLhAhoqAkMFUo6gudkJ9weNXhUYCiLDzcUpFpkk8Wt
PsddFKi32cMJ2qPjf43Qv5GDWLDPZb3T3bF6fLKiF5HtvHNU7aP
Psithaca2MLRFYargivpo7YvUr7wUDqyxrdhC5CQq78mRvimz6A
Pt24m4xiPbLDhVgVfABUjirbmda3yohdN82Sp9FeuAXJ4eV9otd
PtCJ7pwoxe8JasnHY8YonnLYjcVHmhiARPJvqcC6VfHT5s8k8sY
PtEdo2ZkT9oKpimTah6x2embF25oss54njMuPzkJTEi5RqfdZFA
PtEdoTezd3RHSC31mpxxo1npxFjoWWcFgQtxapi51Z8TLu6v6Uq
PtGRANADsDU8R9daYKAgWnQYAJ64omN1o3KMGVCykShA97vQbvV
PtHangz2aRngywmSRGGvrcTyMbbdpWdpFKuS4uMWxg2RaH9i1qx
PtJakart2xVj7pYXJBXrqHgd82rdkLey5ZeeGwDgPp9rhQUbSqY
PtKathmankSpLLDALzWw7CGD2j2MtyveTwboEYokqUCP4a1LxMg
PtLimaPtLMwfNinJi9rCfDPWea8dFgTZ1MeJ9f1m2SRic6ayiwW
Useful command to debug a node that is not syncing
octez-admin-client p2p stat
Though, in our case with the single local node, the result is not very interesting:
GLOBAL STATS
  ↗ 0 B (0 B/s) ↘ 0 B (0 B/s)
CONNECTIONS
KNOWN PEERS
KNOWN POINTS
What we have learned so far
In this chapter, we saw how to install the CLI. We also introduced you to simple remote procedure calls for a Tezos node. Along the way, we understood how to connect to a remote community node or to a local node using a sandbox.
In the next chapter, we will learn in detail how Tezos allows on-chain decentralized governance without relying on the problematic hard forks.